The Instituto Geológico y Minero de España (IGME / Geological and Mining Institute of Spain) provides free access to a variety of data. From their extensive collection we've selected a number of GIS data sets to use with ArcGIS and iGIS, including geologic maps at several scales, and country-wide neotectonic and hydrology maps.
 |
| Example ArcGIS screenshot on iPhone: Series 2 1:50,000 Geologic Map over Topographic basemap. |
 |
| Example iGIS screenshot on iPhone: 1:1,000,000 Geologic Map over Google Map basemap. |
Even though ArcGIS and iGIS offer similar capabilities, we will still be using both apps, as from the perspective of this particular field trip each excels in different ways:
- ArcGIS displays data served by remote servers, so it requires a network connection, but little computational power to display the maps. (To provide Internet access during the trip, we will be relying on one or more XCom Global Mobile Hotspots, the subject of a previous post.)
- iGIS works with data stored locally on the device, so it requires you to plan ahead and pre-load all the data, and sufficient computational power on the device to draw the maps. (Note that iGIS's basemaps -- Google's Satellite, Hybrid, and Map views -- do require a network connection.)
- Some data sets are only available for on-line viewing; hence, they can only be used with ArcGIS. (We are focusing on freely and easily available data sets for this trip, of which some are available for free to view on-line, but have costs associated with downloading the underlying GIS data.)
- Image data, such as geo-referenced images of maps, cannot be viewed in ArcGIS unless you set-up your own server to provide access, but we are not doing so for this trip. Such imagery can be imported to iGIS.
- Data can be quickly and easily assembled by one person and shared with a group in ArcGIS.
- While zip files of data prepared for use in GIS can be shared, transferring the zip files and assembling the data into projects inside iGIS is a multi-step, time-consuming processes, which each user has to do individually.
- ArcGIS is available for iOS, Android, and Windows Mobile, while iGIS is only currently available for iOS.
In the case of the new, unified series of 1:50,000 geologic maps, the data are available for download, just not for free. If your budget allows and your needs justify it, IGME offers each 1:50,000 maps' GIS dataset for €30, with a discount for educational institutions, though I'm unsure if that is for single- or multi- person use. The downloaded GIS data can then be used with both ArcGIS and iGIS.
Our solution for accessing 1:50,000 geologic maps in iGIS is to download cropped, georeferenced images of an older series of the maps that IGME offers for free. These maps are not unified, so their colors, symbols, ages, and contacts can vary from one sheet to the next, and they do not have structural features symbolized; and, of course, the geologic interpretations are older. For our purposes, however, they can still provide much of the local detail we are looking for at specific stops.
 |
| Series 2 1:50,000 (Sheets: Llanes and Carrena Cabales) in ArcGIS. |
 |
| Same extent as above, with Series 1 1:50,000 (Sheets: Llanes and Carrena Cabales) in iGIS. |
With both apps we will be making do without the underlying GIS data at this scale; in ArcGIS Online the shapefiles are hidden on the server and in iGIS all we have are images. So neither app can provide the feature pop-ups for the 1:50,000 maps that we have in both apps for the 1:1,000,000 map (only Spanish language in iGIS though).
So what are the key capabilities gained from having access to these digital data sets, over the traditional paper guide book?
- GPS capabilities enable students to easily and rapidly locate themselves
- Pop-up displays indicating the formation, age, lithology, etc. enable students to quickly identify geologic features
- Panning, zooming, searching, and overlaying capabilities enable students to rapidly and intuitively explore data from different perspectives, at a variety of levels, and in multiple combinations and contexts.
ArcGIS App
For the ArcGIS app, students going on the trip need to download the free app to their device and sign-up for a free ArcGIS Online account. On the ArcGIS Online website we created a group for the field trip, and once students have an account there, then we can add them to that group.We created one initial map containing our itinerary and a collection of IGME data sets. We then shared that map with the group so that all the students have access to the same map initially.


 Also to make things easier for the students, our shared map contains a couple modifications from the defaults: we renamed layers for clarity and we customized pop-ups to simplify the information presented. For instance, for the 1:1,000,000 geologic map of Spain, we reduced the information displayed from over one hundred fields by default, to just a few conveying the unit ID, age information, and Spanish and English language lithologic descriptions. Small, easy tweaks like that on your part as an instructor are essential in providing students with a focused, intuitive environment optimized for your specific educational goals.
There are other customizations you might want to consider as well. For instance, the default transparency of layers seems to work great indoors; however, after a few trips outside in the glare of the sun, I think we may need to increase the geology layers' transparencies from the default level. (An important mantra to keep in mind... if you're going to use it outdoors, then remember to test it outdoors before you need it.)
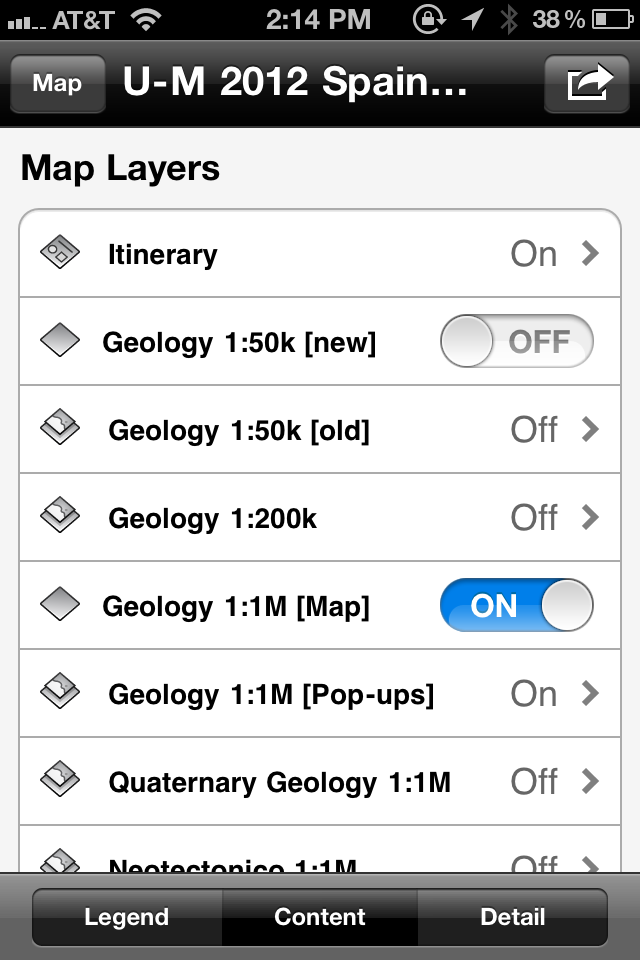
Below is the list of the layers we selected for our shared field trip map. I've included the original IGME names and some general notes for reference. All of the layers, except the Itinerary, ultimately come from IGME's ArcGIS servers. The itinerary layer was created from a shapefile uploaded to ArcGIS Online, so the ArcGIS Online servers are its source. (If the ArcGIS app cannot access the server for a layer, it fails silently, the only indications being the progress wheels has stopped spinning and you don't see the data your were expecting.)
- Itinerary -- Uploaded from a shapefile; originally created as a shared map in Google Map's My Places, exported as KML, and converted to a point shapefile (stops only) in ArcCatalog; skipped transferring routes, which could go to a separate line shapefile.
- Geology 1:50k [new] -- "IGME - Cartografía Geológica Continua GEODE 50" -- Unified series of 1:50k maps, units are labeled numerically, structural features are symbolized (though not correctly oriented), pop-ups unavailable with free access.
- Geololgy 1:50k [old] -- "Mapa Geológico de España 1:50.000 (MAGNA)" -- Older series of 1:50k maps, units are not labeled, no structural symbols, pop-ups unavailable with free access.
- Geology 1:200k -- "IGME - Mapa Geológico de España a escala 1/200.000" -- Regional-scale geologic maps, limited coverage of country, units are labeled, structural features are symbolized, pop-ups available.
- Geology 1:1M [Map] -- "IGME - Mapa Geológico de la Península Ibérica, Baleares y Canarias a escala 1M" -- Units are labeled, and pop-ups available but deliberately disabled (use pop-up layer below instead).
- Geology 1:1M [Pop-ups] -- "ESP IGME 1:1M GeologicalMap" -- Pop-ups are enabled and customized; layer transparency set to 100% to hide it (use in conjunction with map above).
- Quaternary Geology 1:1M -- "ESP_1M_IGME_QuaternaryMap"
- Neotectonioco 1:1M -- "IGME - Mapa Neotectónico de España a escala 1/1.000.000"
- Hydrogeology 1:1M -- "IGME - Mapa Hidrogeológico 1M"
- Cantabria Geology 1:100k -- "IGME - Mapa Geológico de Cantabria a escala 1:100.000" -- Regional map, units not labeled, structural features are symbolized, pop-ups unavailable with free access.
- Geology 1:1M [Full Pop-ups] -- "IGME - Mapa Geológico de la Península Ibérica, Baleares y Canarias a escala 1M" -- Duplicate layer; full set of fields enabled in this layer's pop-ups.
- Topographic -- Selected this as the basemap, as it has a nice mix of roads and topography without being too busy in most areas to obscure the geologic layers; can always switch to other basemaps on the fly.
 |
| Example screenshot of ArcGIS on iPad: 1:1,000,000 Geologic Map of Spain over Google Map basemap, with identify pop-up indicating unit ID, lithology, and age. |
iGIS App
iGIS is usually available for a small fee, however, when I last checked the AppStore, both the iPhone and iPad versions were currently free. It does take more effort to get up and running, however, it provides access to your data regardless of the availability of a network.With iGIS data needs to be transferred to a device (via iTunes) ahead of time, and incorporated into projects created on the device. For this trip, we anticipate students will need to transfer and import a total of ~1.5GB of data. On an iPhone 4S the transfer and import process took ~1 hour. (Note: as you transfer and import more and more data, it takes longer and longer for iTunes to respond when you click on iGIS in the File Sharing area, so please be patient.) After transferring all the data, it than took ~30 minutes to create and configure the projects.
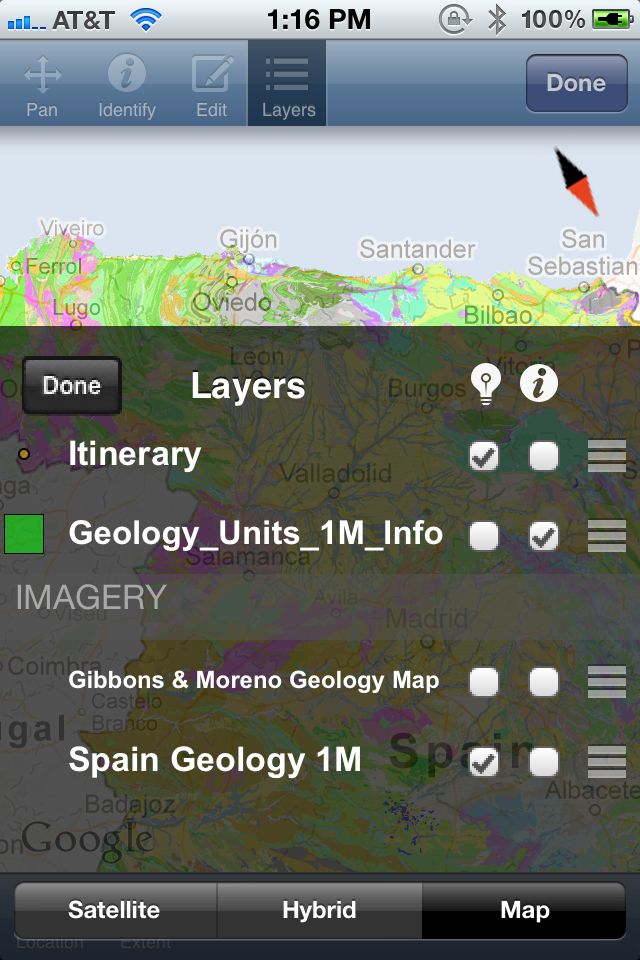 We are providing access in iGIS to most of the same IGME data sets listed above for ArcGIS; the main exceptions being the different series of 1:50,000 geologic maps, no English language lithologies, and access to scanned, geo-referenced map images (e.g., the generalized geologic map from The Geology of Spain, Gibbons and Moreno, 2002).
 We've done as much pre-processing of the data as possible to simplify things for the student: we've downloaded the desired data sets from IGME, geo-referenced them or re-projected them (if needed), tiled imagery at appropriate zoom levels, and zipped the results up. Students just need to obtain and transfer the various zip files for each data set. Also, just like we did for the students in ArcGIS, we renamed data sets for clarity and eliminated extraneous fields from the feature identification pop-ups.
Once a student successfully transfers the data to their device, they then need to create projects and add data to those projects. They can also customize the projects to make things easier later on, such as setting transparency levels, modifying symobolization, specifying the label field, etc. I would also recommend switching the basemap from Satellite to Map for clarity (and keep in mind that there will be no basemap, if there is no network connectivity.)
 There is a limit to how much data you can access in a single iGIS project, however, iGIS always seems to fail gracefully when you try to do too much at once. For our data we found that we would need multiple projects. Our plan for distributing the data among projects is as follows:
- One general project containing trip-wide information: the itinerary, the 1:1M geologic map as an image, the 1:1M geology shapefile to provide the pop-up info, and other country-wide imagery and maps.
- A project for each day containing the itinerary, the 1:1M geologic map image and shapefile, and the 1:50k geologic maps covering the day's stops or routes. (Note: more than six or seven 1:50k maps in the project seem to render it unstable.)
- If necessary, additional projects can also be easily created in the field using the data already on the device. For instance, if daily projects prove too big and unstable, we can create projects for an individual stop with even less data in them.
Doing things as a group also ensures everyone has a similar map, with the same look-and-feel, thereby reducing the possibility for confusion later on in the field when you're having a group discussion. Once you get at a couple students up to speed, rely on them to help rest get up and running.
 |
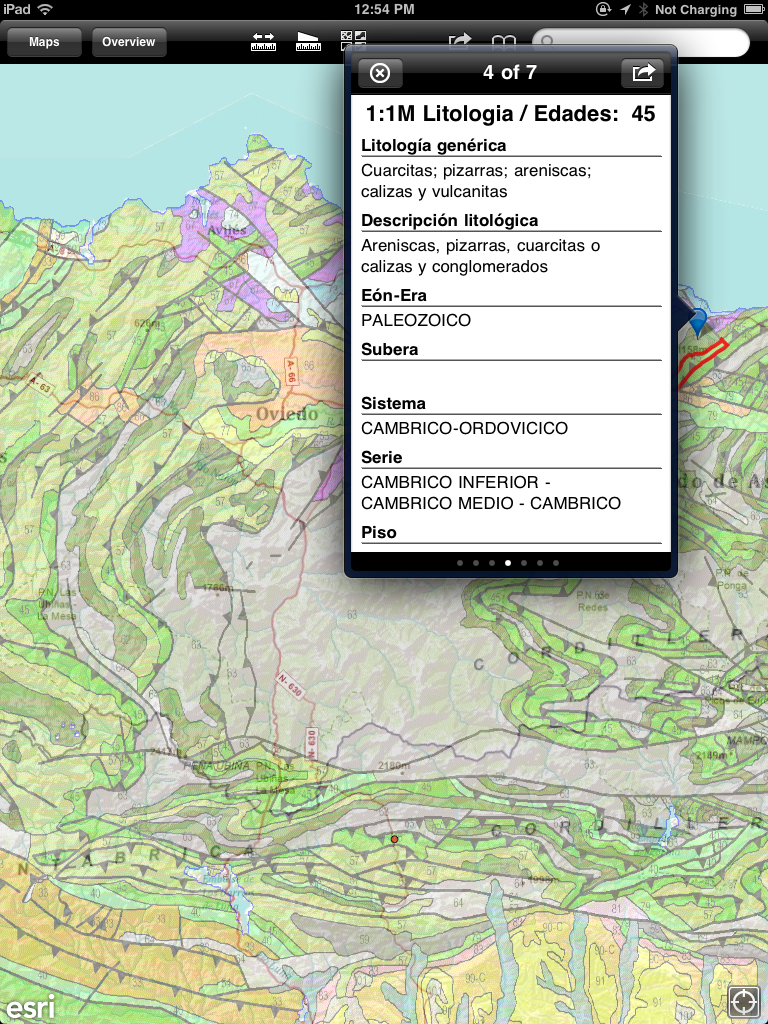
| Example screenshot of iGIS on iPad: 1:1,000,000 Geologic Map of Spain over Google Map basemap, with identify pop-up indicating unit ID, lithology, and age. |
No comments:
Post a Comment