Thursday, July 19, 2012

Data Access on International Field Trips: Success

 An Xcom Global Unlimited aXcess MiFi Mobile Hotspot. 
With our two-week geology field trip to Spain complete, there is much to reflect on.  We learned a lot about using smartphones and tablets as "GeoPads" to access GIS maps and electronic references during the trip, which I'll share in a series of posts.

For this first post, I'll follow-up on the original Data Access on International Field Trips thread, and report that we had great success using two Xcom Global Unlimited aXcess MiFi Mobile Hotspots. We were able to provide our 20-person group with unlimited Internet access nearly everywhere we went, even in some fairly remote areas, with very little difficulty, and at a reasonable cost of $556.14 for the 13-day trip.  


Our main goals in providing Internet access were met as well:
  • Viewing geologic maps served by the Instituto Geológico y Minero de España (IGME) using the ArcGIS app, both at the outcrop and while traveling in our vehicles. (We also had off-line copies of most of the same data for use with iGIS.)
  • Help with navigation and real-time re-routing using Google Maps.
  • Assistance with trip logistics by having access to the web and a variety of apps.
  • Keeping the trip blog up-to-date via the Blogger app and Blogger email gateway.
  • Real-time position reporting on the trip blog via the Google Latitude app and widget.
  • Support for personal Internet use by students, such as keeping in contact with their family and friends, updating their own trip blogs, searching the web for all sorts of additional information relevant to the trip (and otherwise), sharing photos from the trip, and so on...
I am happy to report that the main technical issues we encountered did not significantly impact our overall goals for Internet use on the trip.  Hopefully these issue can be addressed in the future:
  • The hotspots are designed to only easily work on battery power, and two batteries were not enough to get through a full day.  So even with a vehicle as a readily available power source, you cannot just plug the hotspot into the vehicle's power point and forget about it. We will have to wait for a update to the hotspot hardware to address this issue; meanwhile we found a workaround I describe below in the "Power" section.
  • Not enough hotspots to serve everyone.  We had three vehicles, but only two hotspots; though sometimes those without a hotspot in their vehicle could successfully connect to one in a nearby vehicle.  Also, each hotspot can only support five devices, while at times we had more than that trying to connect. For future trips we will need to consider increasing the budget for this type of equipment, or perhaps hotspots will support more devices in the future.
  • On this trip the hotspots worked just fine, however, as I mentioned in a previous post, we tried an Xcom hotspot on a prior trip to Spain, but never got it to work.  Xcom did provide a complete refund. This should serve as reminder to always have a back-up plan in mind.
So what did we learn about using these hotspots to provide Internet access on an international geology field trip?


Cost

We had three vehicles on the trip, but only two hotspots.
We ended up renting two Xcom Global Unlimited aXcess MiFi Mobile Hotspots. The field trip ran from 18-30 June 2012, a 13-day rental period for the hotspots. In addition to the base fees, we also opted for insurance and an extra battery for each device. For each unit, that came to $21.39 per day, or $278.07 per unit for the trip; or, all together for both units, $42.78/day and $556.14 total.


Since these hotspots offer unlimited data, we did not worry about how much we used them. Unfortunately we were unable to gather reliable statistics on how much data we did use, so I cannot report stats like total gigabytes for the trip. I can say, however, that we consciously did not make any effort to limit people's access during the trip, and we never ran into any issues with warnings or throttling of our bandwidth.

Another aspect of cost, of course, is the time invested in obtaining, configuring, and maintaining things, and we found the hotspots took up little of our time.  Ordering the hotspots through the Xcom Global website is straight-forward and only takes several minutes.  There is no set-up or configuration that you are required to do, just power the hotspot up when you get to your destination country and off you go.  Also, since the configurations of each hotspot are identical, you only have to setup your device once, and you can seamlessly connect to either hotspot when in range.  The only maintenance that you need to do is to keep the batteries charged, which is the one area that frustrated us a little, which I discuss further in the "Power" section below.

I will note that the hotspot's default configuration is a public, unsecured WiFi network.  If you feel the need to lock it down, then instructions on how to do so are provided with the units.  We chose, however, to not spend time on it and stay focused on the geology. If an issue arose during the trip, then we would worry about addressing securing things, but in the end, we had no problems. The default set-up also saves time for the users, as they don't have to find out a password or specify other configuration parameters, they could just look for the network, add it to their defaults, and be set for the rest of the trip.

We also spent about $140 on AT&T International Data Plans for the two US trip leaders' iPhones as a back-up.  If the hotspots hadn't worked, we still wanted to be able to update the trip blog, use Google Maps for navigation, and have access to the web to help with all those unplanned moments and needs that arise during a field-trip.

Mobility

On the way back from dinner a student
captures the hotspot's connectivity light
glowing from inside my pocket.  Its purple color
indicates it is connected at
its highest supported speed. 
We were able to provide Internet access via the hotspots pretty much everywhere we went on the trip.  There were only a handful of remote locations where we managed to get beyond the reach of cell towers.

Much of the time on a geology field trip is of course spent in vehicles, and that is where Internet usage was the heaviest on this trip.  At stops, however, we would bring the hotspots in to the field with us, for example to provide access to the maps in ArcGIS and for blog updates.  The hotspots easily fit in a pocket, and you can also toss the spare battery in your backpack, if you're going to be out for awhile.

Many of the places we stayed also provided free WiFi for guests in their common-areas, however, free WiFi isn't as ubiquitous in Spain as we are used to in the United States.  Often in the evenings, when we were out and about to explore a town or for dinner, we brought along our hotposts.

Scalability

Among twenty participants we had at least twenty-six smartphones,
tablets, laptops, etc. connected at various times during the trip.
We rented two hotspots for the trip. We knew that would not be enough to cover everyone all the time, as we were split among three vehicles and each hotspot could only serve five devices; however, we felt it was sufficient coverage to evaluate how Internet access could improve the educational experience of the field trip. In fact, the hotspot-less vehicle could at times connect to the hotspot in the vehicle in front of it, and when we were at stops or when we took the hotspots hiking with us, everyone was close enough to have an opportunity to connect.


Based on examining the hotspot logs during the trip, we had at least 26 Internet devices being regularly used, mostly smartphones and tablets, among our 20 participants. Several people did not bring any such devices, however, others like myself had four (two smarphones, one tablet, and one laptop).

Our main scalability issue, therefore, was the limit of five devices per hotspot. For our lead vehicle the hotspot only had to serve four people, though at least one person had both an iPhone and iPad, so it rarely ran into the limit. Our second vehicle was a van with seven people, nearly all of whom had at least one device, and we often ran into the device limit there.

For the students in the second vehicle, an easy way to address the problem was to simply ask folks who were no longer actively using their device to manually disconnect, thereby freeing up a connection for others to use. Or, if we were referencing something on a device as part of our discussion, we could simply pass one person's device around, or use the display on the iPad mounted on the windshield as a common screen (though it was hard to see details from the back row of seats.)

In the second vehicle we also had on an iPhone and iPad mounted on the windshield that we always wanted connected, as we relied on them for our navigation and geology maps. When we turned those devices off to save power at a stop, they would sometimes lose their connections to other devices that were actively being used at the stop. To quickly get the two connected again, we would simply reboot the hotspot, and manually re-connect them to the network before others' devices had time to automatically reconnect. That process would take a minute or so; mostly just waiting until the network was back up, and then a few taps and swipes latter they were back in business.

One scalability issue we had been concerned about, but never really encountered, was running out of bandwidth with some many people sharing the same connections. Overall we seldom experienced sluggishness in maps updating or web pages loading.  When we did, it was often because we were in one of the few areas with slower-speed cellular data.

We did find that streaming-type services, like our campus radio station's Internet feed (WUOM) or Skype calls, did not work well. In general the streams would keep dropping out after several seconds, or the calls would be to choppy, so it may have been a latency issue that one could get around with some tuning. Nothing critical that we were doing, however, relied on streaming services, so we didn't investigate this thoroughly.

Power

An example of a USB car charger that can be used to
power the hotspot through its USB-micro cable.
While the hotspots provided the Internet access we needed, keeping them powered was more of a challenge than we had anticipated. We did order an extra battery for each unit, and the batteries powered the units for 2-4 hours; the actual time varied significantly, as you would expect, depending on cellular signal strength, what type of cellular connection was available, how much it was being used, etc.

We had expected, however, to be able to power the hotspots using our vehicle's power points, and had brought along our own USB car chargers for just that purpose. (Xcom does not offer vehicle chargers as one of their optional items; if you bring your own, make sure it puts out sufficient power to meet the hotspot's requirements.) We found that if the hotspot is on, and a battery is in it, then it will draw power from the battery, regardless of whether it is plugged in to a power source or not.  In fact, the instructions that come with the hotspot make a big point of your not plugging the hotspot in to power when it is on. It states the unit should be turned off before plugging it in to charge the battery. In other words, you can either use the hotspot while its battery lasts, or you need to turn it off and charge the battery.

To get around this limitation, we found that we could turn the unit on, then plug it into the vehicle's power point, then remove the battery, and it would work just fine using the vehicle as the power source. Of course, this meant you also had to remember to put the battery back in before you turned the vehicle off.  This was a source of frustration when we forgot to do that, and we would lose a minute or two while we waited for the hotspot and our devices to reconnect after we put the battery back in. In most cases this delay did not impact what we were doing, and we could pick-up where we left off; however, some apps would reset themselves or get hung when the connection was gone for too long, and we would have to start over. (If you're lucky enough to have a vehicle whose power-point is always on, then this would be much less frustrating.)

Overall we were very pleased with the hotspots and highly recommend using them to provide Internet access on international field trips, particularly given the high cost of individual carriers' international data plans. It's also a solution worth considering for those doing international field work, though the savings may not be as great when you're dealing with a small number of devices.

Monday, July 16, 2012

Electronic Reference Materials on Field Trips: PDFs

Cover of Field Trip Guide viewed
on iPhone in Adobe  Reader.
In addition to traditional paper field trip guides for our upcoming geology field trip to Spain, we are also providing an electronic (PDF) version for students with smartphones and tablets.  In a previous post I discussed the benefits of using GIS apps to enable exploration and manipulation of the information that is typically presented on paper maps in a guidebook.  In this post I look at the benefits of a PDF version of the guidebook for use with Adobe Reader or other PDF apps.  


This electronic document approach also allows us to provide students with access to supporting reference materials that we couldn't fit into a reasonably-sized guidebook. Typically such extra materials would be available as single copies that only one person could examine at a time.  In addition, assuming our international WiFi hotspots are working, students with smartphones and tablets will also be able to access the wealth of information the web has to offer.

These days students are very comfortable working with electronic versions of documents, and the capabilities that apps like Adobe Reader offer.  Some of the benefits of electronic reference materials we are looking to take advantage of on this trip include:
  • Searchable -- As with any electronic document, one of the great advantages over paper is being able to search for text within the document, such as a formation name, an author, a city or road name, a species of fossil, etc.


Searching for references to the Buntsandstein formation
in the field guide in Adobe Reader on an iPhone.


  • Pan/Zoom -- A paper guidebook limits you to the resolution, scale, and paper size you select at the time of printing.  In the electronic version you can easily pan and zoom the contents of the guidebook, such as figures or maps.  You are of course still limited by the screen size of your device, and being able to view a large area at a readable resolution (i.e., text on a map) works better on tablets than smartphones.

A complete page view in
Adobe Reader on an iPhone.
Zoomed in to the Cameros Basin on the same page.
  • Clickable Table-of-Contents -- Students can click on a entry in a table-of-contents or index and jump straight to that section.  For instance, you might have major headings for each day and sub-headings for each stop.  Apps like Adobe Reader also provide intuitive features for navigating a document, like thumbnail pages, slider bars, etc.

Clickable Table-of-Contents in Adobe Reader on iPhone.
  • Links --The Table-of-Contents isn't the only place you can have links in your documents of course.  Field guidebooks often borrow heavily from papers or the web, and you can easily link references in the guidebook to the original publications -- providing them in electronic format as well, if you desire, or linking to them on the web -- for students who want to delve deeper on a subject.  
  • Scope of Information -- Printing costs and physical usability are among the things that limit the scope of materials you can include in a paper field trip guide.  By using electronic documents instead, you can include a wealth of additional, supporting reference materials for students who wish to explore further.
The main PDF app that we are recommending students use for this trip is Adobe Reader, as it is available for a variety of smartphone and tablet operating systems.  For iOS devices, students can of course use iBooks as well.  In brief preliminary testing with our guidebook and some large map sheets included as additional reference materials, we found that Adobe Reader seemed to perform faster than iBooks when it came to scrolling and zooming through those documents.

While PDF is pretty much the ubiquitous electronic document format today, particularly for scientific papers, there are other formats for which the above benefits are equally applicable, such as Microsoft Word or Google documents.  So you are not limited to one method or format for authoring a guidebook.  


In our case, the guidebook was created in Microsoft Word and optimized for printing on A4 paper (as we had the guide printed in Spain rather than before we left in the US.)  The electronic version was then simply created by saving it in PDF format, so little effort was required to produce it, besides making the table-of-contents clickable.

Thursday, June 7, 2012

Electronic Reference Materials on Field Trips: ArcGIS and iGIS Apps

We are assembling a variety of reference materials for our upcoming geology field trip though northwestern Spain, including papers, key figures, maps, photographs, thin section images, road logs, etc. These materials will be presented in a traditional paper guidebook, and as a PDF for students to use on their smart-phones and tablets, the advantages of which I'll cover in an upcoming post.  In this post, I take look at how students can benefit from also having access to the GIS data sets behind the maps in the guidebook using apps like ArcGIS and iGIS.

The Instituto Geológico y Minero de España (IGME / Geological and Mining Institute of Spain) provides free access to a variety of data.  From their extensive collection we've selected a number of GIS data sets to use with ArcGIS and iGIS, including geologic maps at several scales, and country-wide neotectonic and hydrology maps.

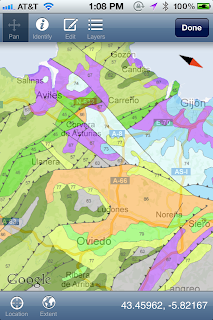
Example ArcGIS screenshot on iPhone: Series 2 1:50,000 Geologic Map over Topographic basemap.
Example iGIS screenshot on iPhone: 1:1,000,000 Geologic Map over Google Map basemap.

Even though ArcGIS and iGIS offer similar capabilities, we will still be using both apps, as from the perspective of this particular field trip each excels in different ways:
  • ArcGIS displays data served by remote servers, so it requires a network connection, but little computational power to display the maps.  (To provide Internet access during the trip, we will be relying on one or more XCom Global Mobile Hotspots, the subject of a previous post.)
  • iGIS works with data stored locally on the device, so it requires you to plan ahead and pre-load all the data, and sufficient computational power on the device to draw the maps. (Note that iGIS's basemaps -- Google's Satellite, Hybrid, and Map views -- do require a network connection.)
  • Some data sets are only available for on-line viewing; hence, they can only be used with ArcGIS.  (We are focusing on freely and easily available data sets for this trip, of which some are available for free to view on-line, but have costs associated with downloading the underlying GIS data.)
  • Image data, such as geo-referenced images of maps, cannot be viewed in ArcGIS unless you set-up your own server to provide access, but we are not doing so for this trip. Such imagery can be imported to iGIS.
  • Data can be quickly and easily assembled by one person and shared with a group in ArcGIS.
  • While zip files of data prepared for use in GIS can be shared, transferring the zip files and assembling the data into projects inside iGIS is a multi-step, time-consuming processes, which each user has to do individually.
  • ArcGIS is available for iOS, Android, and Windows Mobile, while iGIS is only currently available for iOS.
In terms of data that are only accessible online using the ArcGIS app, we are particularly interested on this trip in the English language lithological descriptions for the 1:1,000,000 geologic map and the newer, unified 1:50,000 geologic map series.  In the case of the English lithologies, it may be that we just haven't found the right place to download a version we can easily use in iGIS.

In the case of the new, unified series of 1:50,000 geologic maps, the data are available for download, just not for free. If your budget allows and your needs justify it, IGME offers each 1:50,000 maps' GIS dataset for €30, with a discount for educational institutions, though I'm unsure if that is for single- or multi- person use.  The downloaded GIS data can then be used with both ArcGIS and iGIS.

Our solution for accessing 1:50,000 geologic maps in iGIS is to download cropped, georeferenced images of an older series of the maps that IGME offers for free. These maps are not unified, so their colors, symbols, ages, and contacts can vary from one sheet to the next, and they do not have structural features symbolized; and, of course, the geologic interpretations are older.  For our purposes, however, they can still provide much of the local detail we are looking for at specific stops.
Series 2 1:50,000 (Sheets: Llanes and Carrena Cabales) in ArcGIS.
Same extent as above, with Series 1 1:50,000 (Sheets: Llanes and Carrena Cabales) in iGIS.

With both apps we will be making do without the underlying GIS data at this scale; in ArcGIS Online the shapefiles are hidden on the server and in iGIS all we have are images. So neither app can provide the feature pop-ups for the 1:50,000 maps that we have in both apps for the 1:1,000,000 map (only Spanish language in iGIS though).

So what are the key capabilities gained from having access to these digital data sets, over the traditional paper guide book?
  • GPS capabilities enable students to easily and rapidly locate themselves
  • Pop-up displays indicating the formation, age, lithology, etc. enable students to quickly identify geologic features
  • Panning, zooming, searching, and overlaying capabilities enable students to rapidly and intuitively explore data from different perspectives, at a variety of levels, and in multiple combinations and contexts.  
These capabilities help students focus on the primary goal of building and understanding a mental model of the geology around them, rather than menial tasks like locating themselves on the map, looking things up in legends, and flipping between multiple sheets.

ArcGIS App

For the ArcGIS app, students going on the trip need to download the free app to their device and sign-up for a free ArcGIS Online account.  On the ArcGIS Online website we created a group for the field trip, and once students have an account there, then we can add them to that group.

We created one initial map containing our itinerary and a collection of IGME data sets.  We then shared that map with the group so that all the students have access to the same map initially.


Students can work with just the original, shared map (but not edit it), or they can save a copy to their own workspace and modify it, or they can even create their own custom maps.  (Modifications cannot be done in the app, rather you need to do it online.)  If a student starts getting confused between various maps and versions, they can always easily go to the initial view of the shared map.  We'll likely focus on just referencing the shared map during group discussions, so that we are all on the same page; however, the flexibility is there for students who want to explore further on their own.

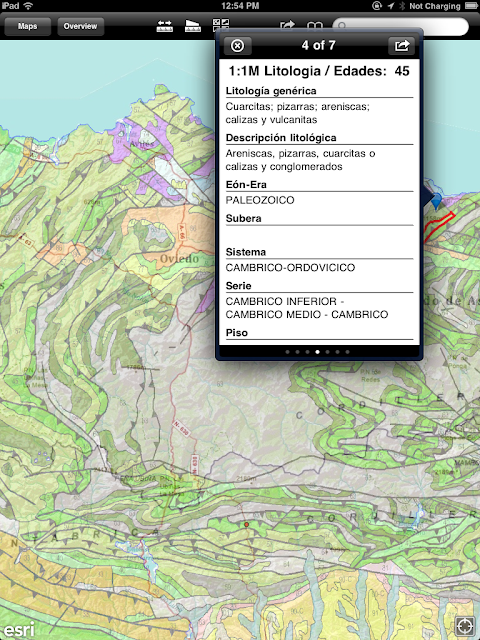
Also to make things easier for the students, our shared map contains a couple modifications from the defaults: we renamed layers for clarity and we customized pop-ups to simplify the information presented.  For instance, for the 1:1,000,000 geologic map of Spain, we reduced the information displayed from over one hundred fields by default, to just a few conveying the unit ID, age information, and Spanish and English language lithologic descriptions.  Small, easy tweaks like that on your part as an instructor are essential in providing students with a focused, intuitive environment optimized for your specific educational goals.

There are other customizations you might want to consider as well.  For instance, the default transparency of layers seems to work great indoors; however, after a few trips outside in the glare of the sun, I think we may need to increase the geology layers' transparencies from the default level.  (An important mantra to keep in mind... if you're going to use it outdoors, then remember to test it outdoors before you need it.)

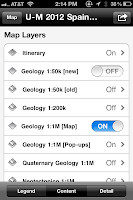
Below is the list of the layers we selected for our shared field trip map. I've included the original IGME names and some general notes for reference.  All of the layers, except the Itinerary, ultimately come from IGME's ArcGIS servers. The itinerary layer was created from a shapefile uploaded to ArcGIS Online, so the ArcGIS Online servers are its source.  (If the ArcGIS app cannot access the server for a layer, it fails silently, the only indications being the progress wheels has stopped spinning and you don't see the data your were expecting.)
  • Itinerary -- Uploaded from a shapefile; originally created as a shared map in Google Map's My Places, exported as KML, and converted to a point shapefile (stops only) in ArcCatalog; skipped transferring routes, which could go to a separate line shapefile.
  • Geology 1:50k [new] -- "IGME - Cartografía Geológica Continua GEODE 50" -- Unified series of 1:50k maps, units are labeled numerically, structural features are symbolized (though not correctly oriented), pop-ups unavailable with free access.
  • Geololgy 1:50k [old] -- "Mapa Geológico de España 1:50.000 (MAGNA)" -- Older series of 1:50k maps, units are not labeled, no structural symbols, pop-ups unavailable with free access.
  • Geology 1:200k -- "IGME - Mapa Geológico de España a escala 1/200.000" -- Regional-scale geologic maps, limited coverage of country, units are labeled, structural features are symbolized,  pop-ups available.
  • Geology 1:1M [Map] -- "IGME - Mapa Geológico de la Península Ibérica, Baleares y Canarias a escala 1M" -- Units are labeled, and pop-ups available but deliberately disabled (use pop-up layer below instead).
  • Geology 1:1M [Pop-ups] -- "ESP IGME 1:1M GeologicalMap" -- Pop-ups are enabled and customized; layer transparency set to 100% to hide it (use in conjunction with map above).
  • Quaternary Geology 1:1M -- "ESP_1M_IGME_QuaternaryMap" 
  • Neotectonioco 1:1M -- "IGME - Mapa Neotectónico de España a escala 1/1.000.000"
  • Hydrogeology 1:1M -- "IGME - Mapa Hidrogeológico 1M"
  • Cantabria Geology 1:100k -- "IGME - Mapa Geológico de Cantabria a escala 1:100.000" -- Regional map, units not labeled, structural features are symbolized, pop-ups unavailable with free access.
  • Geology 1:1M [Full Pop-ups] -- "IGME - Mapa Geológico de la Península Ibérica, Baleares y Canarias a escala 1M" -- Duplicate layer; full set of fields enabled in this layer's pop-ups.
  • Topographic -- Selected this as the basemap, as it has a nice mix of roads and topography without being too busy in most areas to obscure the geologic layers; can always switch to other basemaps on the fly.
Example screenshot of ArcGIS on iPad: 1:1,000,000 Geologic Map of Spain over Google Map basemap, with identify pop-up indicating unit ID, lithology, and age.

    iGIS App

    iGIS is usually available for a small fee, however, when I last checked the AppStore, both the iPhone and iPad versions were currently free. It does take more effort to get up and running, however, it provides access to your data regardless of the availability of a network.

    With iGIS data needs to be transferred to a device (via iTunes) ahead of time, and incorporated into projects created on the device.  For this trip, we anticipate students will need to transfer and import a total of ~1.5GB of data.  On an iPhone 4S the transfer and import process took ~1 hour.  (Note: as you transfer and import more and more data, it takes longer and longer for iTunes to respond when you click on iGIS in the File Sharing area, so please be patient.)  After transferring all the data, it than took ~30 minutes to create and configure the projects.

    We are providing access in iGIS to most of the same IGME data sets listed above for ArcGIS; the main exceptions being the different series of 1:50,000 geologic maps, no English language lithologies, and access to scanned, geo-referenced map images (e.g., the generalized geologic map from The Geology of Spain, Gibbons and Moreno, 2002).

    We've done as much pre-processing of the data as possible to simplify things for the student: we've downloaded the desired data sets from IGME, geo-referenced them or re-projected them (if needed), tiled imagery at appropriate zoom levels, and zipped the results up.  Students just need to obtain and transfer the various zip files for each data set. Also, just like we did for the students in ArcGIS, we renamed data sets for clarity and eliminated extraneous fields from the feature identification pop-ups.

    Once a student successfully transfers the data to their device, they then need to create projects and add data to those projects.  They can also customize the projects to make things easier later on, such as setting transparency levels, modifying symobolization, specifying the label field, etc.  I would also recommend switching the basemap from Satellite to Map for clarity (and keep in mind that there will be no basemap, if there is no network connectivity.)

    There is a limit to how much data you can access in a single iGIS project, however, iGIS always seems to fail gracefully when you try to do too much at once.  For our data we found that we would need multiple projects.  Our plan for distributing the data among projects is as follows:
    • One general project containing trip-wide information: the itinerary, the 1:1M geologic map as an image, the 1:1M geology shapefile to provide the pop-up info, and other country-wide imagery and maps.
    • A project for each day containing the itinerary, the 1:1M geologic map image and shapefile, and the 1:50k geologic maps covering the day's stops or routes.  (Note: more than six or seven 1:50k maps in the project seem to render it unstable.)
    • If necessary, additional projects can also be easily created in the field using the data already on the device.  For instance, if daily projects prove too big and unstable, we can create projects for an individual stop with even less data in them.
    You can always point the students at the iGIS Knowledge Base for instructions on how to import the data and assemble projects. Things will probably go more smoothly, however, if you set aside a couple hours prior to the trip for everyone to get together and walk through the process as a group.

    Doing things as a group also ensures everyone has a similar map, with the same look-and-feel, thereby reducing the possibility for confusion later on in the field when you're having a group discussion. Once you get at a couple students up to speed, rely on them to help rest get up and running.
    Example screenshot of iGIS on iPad: 1:1,000,000 Geologic Map of Spain over Google Map basemap, with identify pop-up indicating unit ID, lithology, and age.


    Wednesday, May 30, 2012

    Xcom Global MiFi Take 1: Unsuccessful

    An initial trial of the Xcom Global MiFi device during a pre-trip visit to Spain was not promising. The device was never able to connect to the local cellular provider's (MoviStar's) network. Even after very prompt, courteous interactions with the Xcom support folks over several days the problem remained unresolved. Xcom did, however, provide a full refund without any hassle. 

    Everything local with the MiFi device worked just fine. Devices recognized and connected to its WiFi network. There was full access to the MiFi's configuration settings. It simply would not connect to MoviStar's cellular data network, so there was no Internet access. The root cause of the problem seems likely to have been an improperly provisioned SIM, however, Xcom was unable to confirm that as the issue. 

    Not being able to pin-point the cause of the problem makes me a little hesitant about trying them again, however, the reports out there generally indicate folks have had success with the Xcom device in Spain and love the service. So, we plan to go ahead and give it another try, and bring two of the Xcom units on our field trip. 


    Hopefully I will have better results to report in a few weeks...

    Thursday, May 24, 2012

    Data Access on International Field Trips

    On field trips abroad the expense of using a smartphone or tablet -- if you need real-time access to on-line data -- is generally a major concern. Most providers' international data plans are very expensive, particularly given the image-intensive nature of the data geologists like to access in the field.  If you are lucky enough to have an unlocked mobile device, then you can try to find a local data plan in your destination country; however, such plans are generally only slightly less expensive. Cost can be an especially big concern if you are expecting students to use personal devices for field trip activities.

    One solution is to rely on apps that work off-line, using pre-loaded data sets, such as Geometry's iGIS app for iOS (more on that approach in an upcoming post.) Another solution is to obtain a mobile WiFi hotspot from one of the newly emerging, reasonably cost-effective providers of unlimited international cellular data services. For our upcoming Spain geology field trip we are looking at XCom Global's Mobile Hotspot with Unlimited aXcess plan as a possible solution. It will enable us to provide both instructors and students with data access during our thirteen-day excursion without breaking our budget.

    Most importantly, network access will allow us to use apps that need to connect to remote data sources to function completely, and which provide capabilities not available in off-line apps.  It will also give us an easy way to access all the information we didn't think to bring along, and access in general for all our needs in today's Internet-connected world.

    [From the Xcom Global website.]
    A mobile WiFi hotspot provides connectivity for multiple devices, though keep in mind all those devices will be sharing the same bandwidth through the hotspot to the Internet. If you need to support simultaneous access to the Internet for a lot of devices, such as everyone hitting a map server as they hop out at a stop, then you probably want to bring along more than one hotspot. Also, based on experience with similar hardware on field trips within the United States, you should only expect each hotspot to provide service to the vehicle it is in; multiple vehicles means multiple hotspots.

    On our upcoming Spain geology field trip, we are thinking about bringing along two hotspots, with the plan to restrict one to instructor-only access, if bandwidth becomes an issue. It will be interesting to see what the responsiveness is like using on-line oriented apps, like ESRI's ArcGIS app, and if we do indeed run into bandwidth constraints. If students spend too much time waiting to zoom or pan, for pop-up info to be retrieved, or for web pages to load, then we will need to consider carefully the situations where such delays out-weigh the wait-time in terms of educational benefits.

    For instance, discussions while travelling are typically more amenable to such technological intrusiveness than when you're at a stop.  You generally have more time while travelling to wait for something to load and can be more tolerant of delays, than when you are spending precious time at a stop[.  When you are in front of the outcrop the technology needs to fade into the background just like any other tool (rock hammer, compass, map sheets, acid bottle, camera, etc.) that supports the learning experience. Do keep in mind, however, that in almost any group you are likely to have at least a few people susceptible to motion-sickness, so plan any in-vehicle activities accordingly.  (And, no, I don't mean grab a bunch of air sickness bags from your flight to the field area; I mean ensure that there are alternative ways to engage in discussions or lessons for those that cannot comfortably read papers or access their devices while moving!)
     
    Xcom Global provides a Novatel Mifi 2372 mobile hotspot, charger, and accessories for $14.95/day for use in most countries.  On top of that you may want insurance, another $3.95/day; not a bad idea when using it in a vehicle or in the field. If you are going to be spending extended periods away from a power source, you may also want additional batteries ($2.49 each/day); battery life is advertised as four hours.  (Note that only a wall charger is included; for use in a vehicle, you need to supply your own cigarette lighter adapter that can be used with the hotspot's USB cable.) If you place your order at least ten days prior to your departure, then shipping is free, otherwise it is an additional $29.90. So for our trip we are looking at a cost per hotspot of $21.39/day, or $278.07 for the duration of our trip.  See the XCom Global website for more information, including additional costs if you happen to be travelling to more than one country on your trip.

    Another concern to keep in mind -- and just as true for field trips in the United States -- is to verify that cellular service exists where you need it. Geologically interesting routes and stops often take you to areas with no cellular service. So be sure to check the coverage before you invest in this solution!

    Thursday, May 17, 2012

    geopad.org off to the field in Spain!

    Near Cap de Creus.
    After a period of inactivity, geopad.org is headed back to the field again!  In June I'll be helping lead a two week geology field trip around northwest Spain, and evaluating a variety of iPhone, iPad, and WiFi devices and apps.  I'll be reporting back here on our experience with the software and hardware, though if you are interested in following the trip too, check out the U-M Spain 2012 Geology Field Trip blog.